Resource options
Avo effortlessly empowers you to build an entire customer-facing interface for your Ruby on Rails application. One of the most powerful features is how easy you can administer your database records using the CRUD UI.
Overview
Similar to how you configure your database layer using the Rails models and their DSL, Avo's CRUD UI is configured using Resource files.
Each Resource maps out one of your models. There can be multiple Resources associated to the same model if you need that.
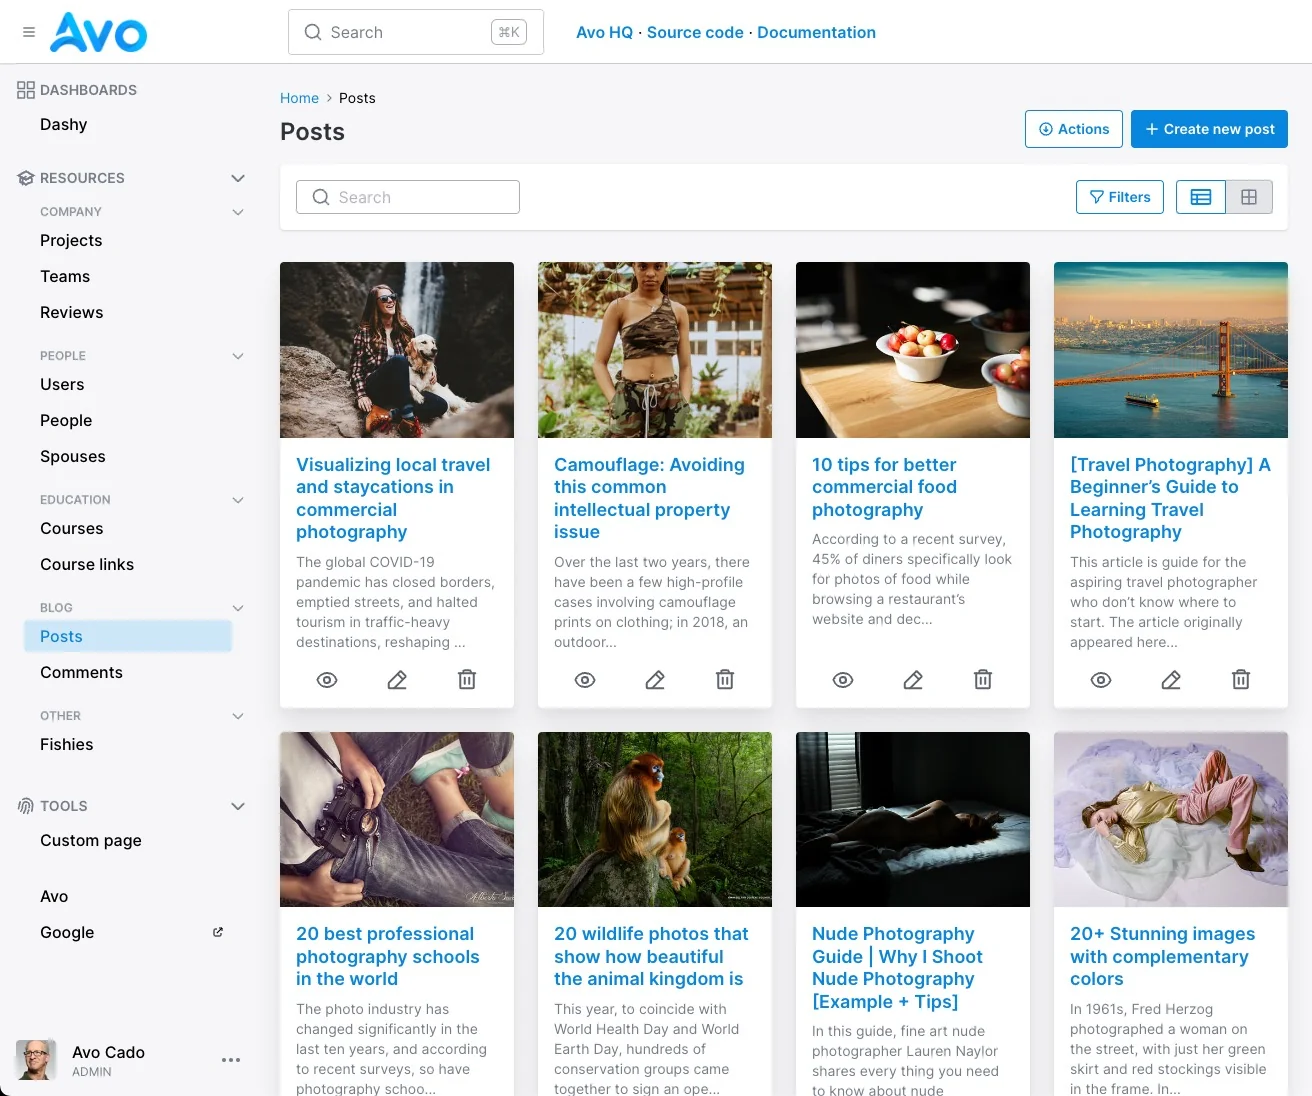
All resources are located in the app/avo/resources directory.
Resources from model generation
bin/rails generate model car make:string mileage:integerRunning this command will generate the standard Rails files (model, controller, etc.) and Avo::Resources::Car & Avo::CarsController for Avo.
The auto-generated resource file will look like this:
# app/avo/resources/car.rb
class Avo::Resources::Car < Avo::BaseResource
  self.includes = []
  # self.search = {
  #   query: -> { query.ransack(id_eq: q, m: "or").result(distinct: false) }
  # }

  def fields
    field :id, as: :id
    field :make, as: :text
    field :mileage, as: :number
  end
end
The auto-generated controller will look like this:
# app/controllers/avo/cars_controller.rb
class Avo::CarsController < Avo::ResourcesController
end
The Avo Resource should always be accompanied by a controller.
This behavior can be omitted by using the argument --skip-avo-resource. For example if we want to generate a Car model but no Avo counterpart we should use the following command:
bin/rails generate model car make:string kms:integer --skip-avo-resourceManually defining resources
bin/rails generate avo:resource postThis command will generate the Post resource file in app/avo/resources/post.rb with the following code:
# app/avo/resources/post.rb
class Avo::Resources::Post < Avo::BaseResource
  self.includes = []
  # self.search = {
  #   query: -> { query.ransack(id_eq: q, m: "or").result(distinct: false) }
  # }

  def fields
    field :id, as: :id
  end
end
From this config, Avo will infer a few things like the resource's model will be the Post model and the name of the resource is Post. But all of those inferred things are actually overridable.
Now, let's say we already have a model Post well defined with attributes and associations. In that case, the Avo resource will be generated with the fields attributes and associations.
# == Schema Information
#
# Table name: posts
#
#  id           :bigint           not null, primary key
#  name         :string
#  body         :text
#  is_featured  :boolean
#  published_at :datetime
#  user_id      :bigint
#  created_at   :datetime         not null
#  updated_at   :datetime         not null
#  status       :integer          default("draft")
#
class Post < ApplicationRecord
 enum status: [:draft, :published, :archived]

 validates :name, presence: true

 has_one_attached :cover_photo
 has_one_attached :audio
 has_many_attached :attachments

 belongs_to :user, optional: true
 has_many :comments, as: :commentable
 has_many :reviews, as: :reviewable

 acts_as_taggable_on :tags
endclass Avo::Resources::Post < Avo::BaseResource
self.includes = []
# self.search = {
# query: -> { query.ransack(id_eq: q, m: "or").result(distinct: false) }
# }
def fields
field :id, as: :id
field :name, as: :text
field :body, as: :textarea
field :is_featured, as: :boolean
field :published_at, as: :datetime
field :user_id, as: :number
field :status, as: :select, enum: ::Post.statuses
field :cover_photo, as: :file
field :audio, as: :file
field :attachments, as: :files
field :user, as: :belongs_to
field :comments, as: :has_many
field :reviews, as: :has_many
field :tags, as: :tags
end
endIt's also possible to specify the resource model class. For example, if we want to create a new resource named MiniPost resource using the Post model we can do that using the following command:
bin/rails generate avo:resource mini-post --model-class postThat command will create a new resource with the same attributes as the post resource above with specifying the model_class:
class Avo::Resources::MiniPost < Avo::BaseResource
  self.model_class = "Post"
end
INFO
You can see the result in the admin panel using this URL /avo. The Post resource will be visible on the left sidebar.
Generating resources for all models
To generate Avo resources for all models in your application, run:
rails generate avo:all_resourcesWhat it does
- Scans your
app/modelsdirectory for model files - Includes only classes that inherit from
ActiveRecord::Base(database-backed models) - Excludes abstract classes (e.g.
ApplicationRecord) - Skips non-model files (concerns, POROs,
Current, form objects) - For each match, it:
- Generates a corresponding Avo resource using the
avo:resourcegenerator - Handles errors gracefully, printing error messages if generation fails for any model
This is particularly useful when:
- Setting up Avo in an existing Rails application
- Ensuring all your models have corresponding Avo resources
Fields
Resource files tell Avo what records should be displayed in the UI, but not what kinds of data they hold. You do that using the fields method.
Read more about the fields here.
class Avo::Resources::Post < Avo::BaseResource
self.title = :id
self.includes = []
def fields
field :id, as: :id
field :name, as: :text, required: true
field :body, as: :trix, placeholder: "Add the post body here", always_show: false
field :cover_photo, as: :file, is_image: true, link_to_record: true
field :is_featured, as: :boolean
Routing
Avo will automatically generate routes based on the resource name when generating a resource.
Avo::Resources::Post         -> /avo/resources/posts
Avo::Resources::PhotoComment -> /avo/resources/photo_comments
If you change the resource name, you should change the generated controller name too.
Use multiple resources for the same model
Usually, an Avo Resource maps to one Rails model. So there will be a one-to-one relationship between them. But there will be scenarios where you'd like to create another resource for the same model.
Let's take as an example the User model. You'll have an User resource associated with it.
# app/models/user.rb
class User < ApplicationRecord
end

# app/avo/resources/user.rb
class Avo::Resources::User < Avo::BaseResource
  self.title = :name

  def fields
    field :id, as: :id, link_to_record: true
    field :email, as: :gravatar, link_to_record: true, as_avatar: :circle
    field :first_name, as: :text, required: true, placeholder: "John"
    field :last_name, as: :text, required: true, placeholder: "Doe"
  end
end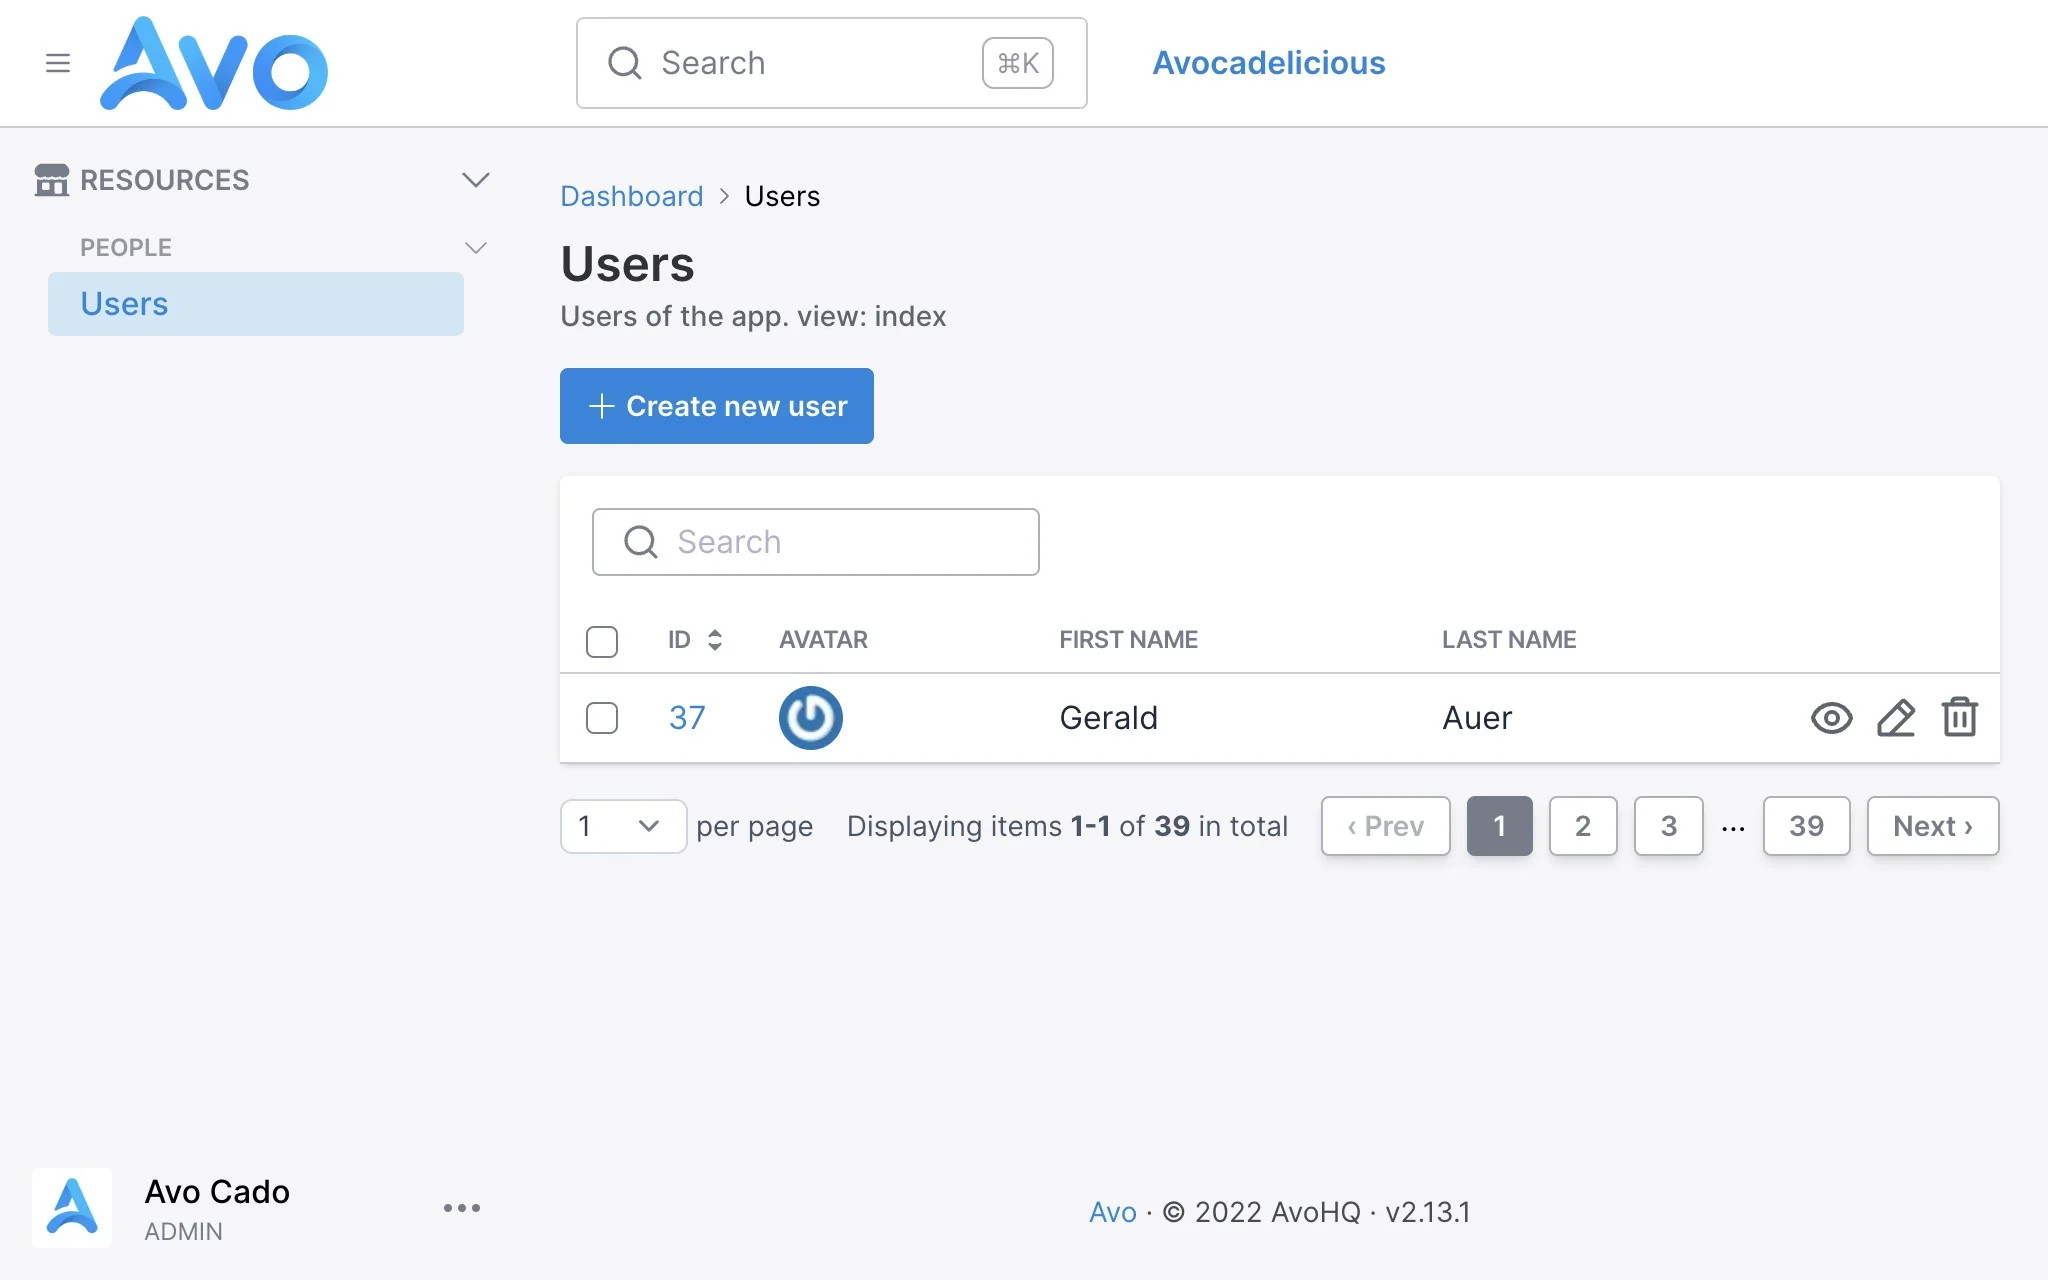
So when you click on the Users sidebar menu item, you get to the Index page where all the users will be displayed. The information displayed will be the gravatar image, the first and the last name.
Let's say we have a Team model with many Users. You'll have a Team resource like so:
# app/models/team.rb
class Team < ApplicationRecord
end

# app/avo/resources/team.rb
class Avo::Resources::Team < Avo::BaseResource
  self.title = :name

  def fields
    field :id, as: :id, link_to_record: true
    field :name, as: :text
    field :users, as: :has_many
  end
end
From that configuration, Avo will figure out that the users field points to the User resource and will use that one to display the users.
But, let's imagine that we don't want to display the gravatar on the has_many association, and we want to show the name on one column and the number of projects the user has on another column. We can create a different resource named TeamUser resource and add those fields.
# app/avo/resources/team_user.rb
class Avo::Resources::TeamUser < Avo::BaseResource
  self.title = :name

  def fields
    field :id, as: :id, link_to_record: true
    field :name, as: :text
    field :projects_count, as: :number
  end
end
We also need to update the Team resource to use the new TeamUser resource for reference.
# app/avo/resources/team.rb
class Avo::Resources::Team < Avo::BaseResource
  self.title = :name

  def fields
    field :id, as: :id, link_to_record: true
    field :name, as: :text
    field :users, as: :has_many, use_resource: Avo::Resources::TeamUser
  end
end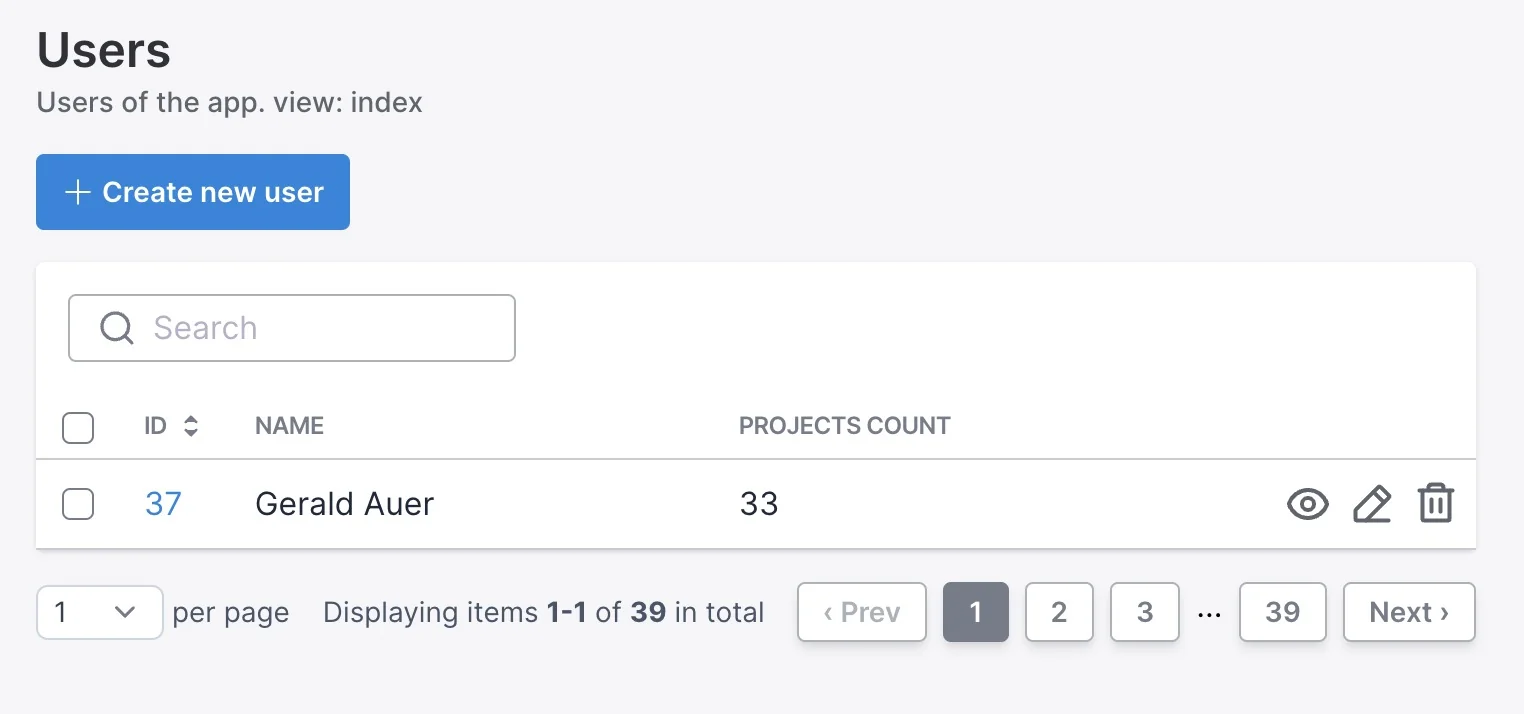
But now, if we visit the Users page, we will see the fields for the TeamUser resource instead of User resource, and that's because Avo fetches the resources in an alphabetical order, and TeamUser resource is before User resource. That's definitely not what we want. The same might happen if you reference the User in other associations throughout your resource files.
To mitigate that, we are going to use the model_resource_mapping option to set the "default" resource for a model.
# config/initializers/avo.rb
Avo.configure do |config|
  config.model_resource_mapping = {
    'User': 'Avo::Resources::User'
  }
end
That will "shortcircuit" the regular alphabetical search and use the User resource every time we don't specify otherwise.
We can still tell Avo which resource to use in other has_many or has_and_belongs_to_many associations with the use_resource option.
Namespaced resources
Resources can't be namespaced yet, so they all need to be in the root level of that directory. If you have a model Super::Dooper::Trooper::Model you can use Avo::Resources::SuperDooperTrooperModel with the model_class option.
class Avo::Resources::SuperDooperTrooperModel < Avo::BaseResource
  self.model_class = "Super::Dooper::Trooper::Model"
end
Namespacing lands in Avo 4
Avo 4 adds full support for namespaced resources — nest them in subdirectories that mirror your model namespace, get automatic model-class inference, and generate any nesting depth with avo:resource. Take a look at namespaced resources in the Avo 4 docs.
Views
Please read the detailed views page.
Extending Avo::ResourcesController
You may need to execute additional actions on the ResourcesController before loading the Avo pages. You can create an Avo::BaseResourcesController and extend your resource controller from it.
# app/controllers/avo/base_resources_controller.rb
class Avo::BaseResourcesController < Avo::ResourcesController
  include AuthenticationController::Authentication

  before_action :is_logged_in?
end

# app/controllers/avo/posts_controller.rb
class Avo::PostsController < Avo::BaseResourcesController
end
WARNING
You can't use Avo::BaseController and Avo::ResourcesController as your base controller. They are defined inside Avo.
When you generate a new resource or controller in Avo, it won't automatically inherit from the Avo::BaseResourcesController. However, you have two approaches to ensure that the new generated controllers inherit from a custom controller:
--parent-controller option on the generators
Both the avo:controller and avo:resource generators accept the --parent-controller option, which allows you to specify the controller from which the new controller should inherit. Here are examples of how to use it:
rails g avo:controller city --parent-controller Avo::BaseResourcesController
rails g avo:resource city --parent-controller Avo::BaseResourcesController
resource_parent_controller configuration option
You can configure the resource_parent_controller option in the avo.rb initializer. This option will be used to establish the inherited controller if the --parent-controller argument is not passed on the generators. Here's how you can do it:
Avo.configure do |config|
  # ...
  config.resource_parent_controller = "Avo::BaseResourcesController" # "Avo::ResourcesController" is default value
  # ...
end
Attach concerns to Avo::BaseController
Alternatively you can use this guide to attach methods, actions, and hooks to the main Avo::BaseController or Avo::ApplicationController.
Manually registering resources
In order to have a more straightforward experience when getting started with Avo, we are eager-loading the app/avo/resources directory. That makes all those resources available to your app without you doing anything else.
If you want to manually load them use the config.resources option.
# config/initializers/avo.rb
Avo.configure do |config|
  config.resources = [
    "Avo::Resources::User",
    "Avo::Resources::Fish",
  ]
end
This tells Avo which resources you use and stops the eager-loading process on boot-time. This means that other resources that are not declared in this array will not show up in your app.
Extending Avo::BaseResource
Since v3.10.7 we have restructured the Avo::BaseResource to enhance user customization capabilities. The existing functionality has been moved to a new base class Avo::Resources::Base, and Avo::BaseResource is now left empty for user overrides. This allows users to easily add custom methods that all of their resources will inherit, without having to modify the internal base class.How to Customize Avo::BaseResource
You can customize Avo::BaseResource by creating your own version in your application. This custom resource can include methods and logic that you want all your resources to inherit. Here's an example to illustrate how you can do this:
# app/avo/base_resource.rb
module Avo
  class BaseResource < Avo::Resources::Base
    # Example custom method: make all number fields cast their values to float
    def field(id, **args, &block)
      if args[:as] == :number
        args[:format_using] = -> { value.to_f }
      end

      super(id, **args, &block)
    end
  end
end
All your resources will now inherit from your custom Avo::BaseResource, allowing you to add common functionality across your admin interface. For instance, the above example ensures that all number fields in your resources will have their values cast to floats. You can add any other shared methods or customizations here, making it easier to maintain consistent behavior across all resources.
Your resource files
Your resource file will still look the same as it did before.
# app/avo/resources/post_resource.rb
module Avo::Resources::Post < Avo::BaseResource
  # Your existing configuration for the Post resource
end
Resource Options
Resources have a few options available for customization.
-> self.title
Each Avo resource will try to figure out what the title of a record is. It will try the following attributes in order name, title, label, and fallback to the id.
You can change it to something more specific, like the model's first_name or slug attributes.
class Avo::Resources::Post < Avo::BaseResource
  self.title = :slug # it will now reference @post.slug to show the title
end
Using a computed title
If you don't have a title, name, or label attribute in the database, you can add a getter method to your model where you compose the name.
# app/avo/resources/comment.rb
class Avo::Resources::Comment < Avo::BaseResource
  self.title = :tiny_name
end

# app/models/comment.rb
class Comment < ApplicationRecord
  def tiny_name
    ActionView::Base.full_sanitizer.sanitize(body).truncate 30
  end
end
title as a block
If you prefer not to use any record methods and instead compute the resource's title directly within the resource itself, you can accomplish this by assigning a lambda function to the title class attribute. You'll have access to resource and record.
# app/avo/resources/comment.rb
class Avo::Resources::Comment < Avo::BaseResource
  self.title = -> {
    ActionView::Base.full_sanitizer.sanitize(record.body).truncate 30
  }
end
-> self.description
You might want to display information about the current resource to your users. Then, using the description class attribute, you can add some text to the Index, Show, Edit, and New views.
WARNING
self.description is rendered as HTML (<%==). Do not use direct user input or any value that users can edit — that can allow stored XSS attacks.
INFO
self.description is not displayed when the resource is rendered as an association (for example, in a has_many table on another resource's page). To show a description there, use the description option on the association field.

There are two ways of setting the description. The quick way as a string and the more customizable way as a block.
Set the description as a string
class Avo::Resources::User < Avo::BaseResource
  self.title = :name
  self.description = "These are the users of the app."
end
This is the quick way to set the label, and it will be displayed on all pages. If you want to restrict the message to custom views, use a lambda function.
Set the description as a block
This is the more customizable method where you can access the record, resource, view, current_user, and params objects.
class Avo::Resources::User < Avo::BaseResource
  self.title = :name
  self.description = -> do
    if view == :index
    "These are the users of the app"
    else
      if current_user.is_admin?
        "You can update all properties for this user: #{record.id}"
      else
        "You can update some properties for this user: #{record.id}"
      end
    end
  end
end
-> self.includes
If you regularly need access to a resource's associations, you can tell Avo to eager load those associations on the Index view using includes.
That will help you avoid those nasty n+1 performance issues.
class Avo::Resources::Post < Avo::BaseResource
  self.includes = [:user, :tags]

  # or a very nested scenario
  self.includes = [files_attachments: :blob, users: [:comments, :teams, post: [comments: :user]]]
end
We know, the array notation looks weird, but it works.
-> self.single_includes
single_includes works the same as includes but it's going to eager load the associations on the Show and Edit views only.
-> self.attachments
Similar to how includes works, you can use attachments to eager load attachments on the Index view.
class Post < ApplicationRecord
  has_one_attached :cover_photo
  has_one_attached :audio
  has_many_attached :attachments
endclass Avo::Resources::Post < Avo::BaseResource
self.attachments = [:cover_photo, :audio, :attachments]
end-> self.single_attachments
single_attachments works the same as attachments but it's going to eager load the attachments on the Show and Edit views only.
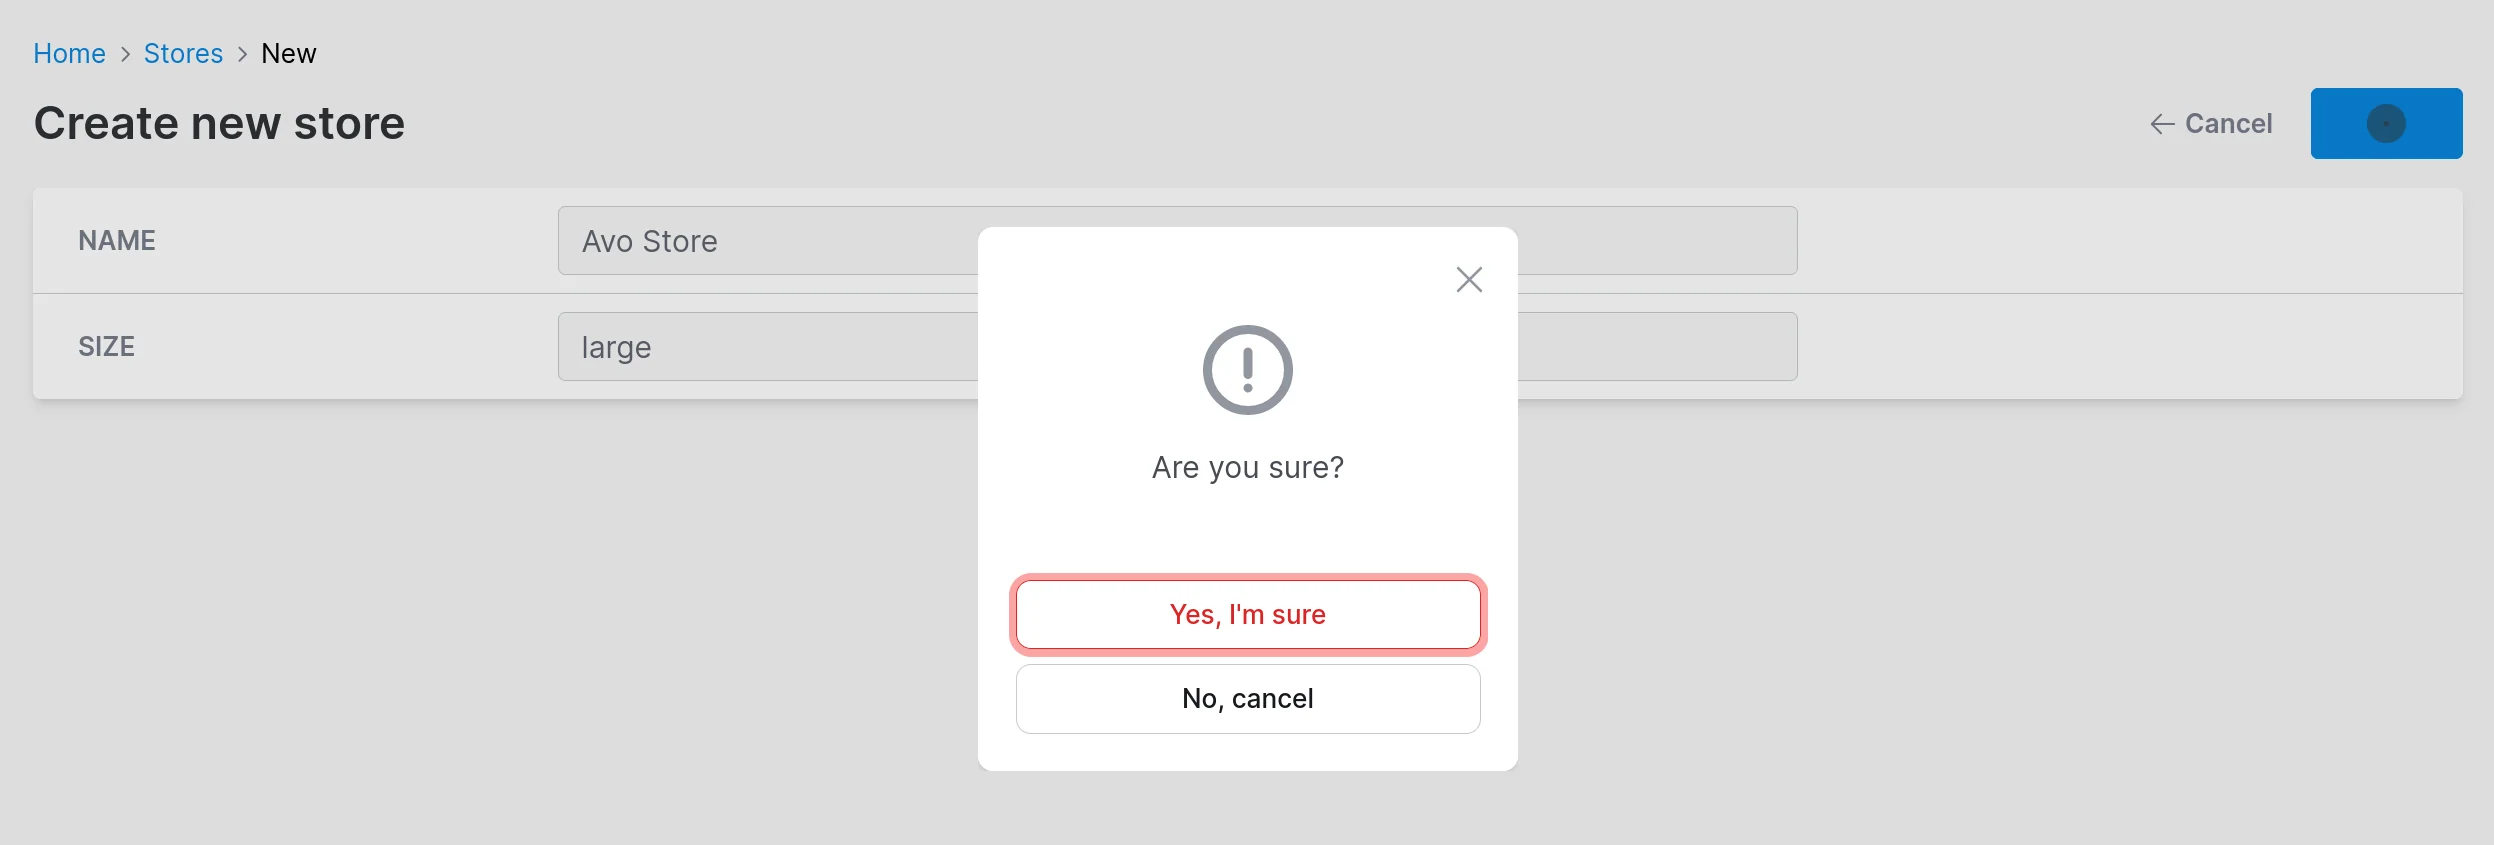
-> self.confirm_on_save
If you would like to ask for confirmation when saving a resource you can do so by setting confirm_on_save to true.
That will help add friction to the saving process, avoiding human error.
class Avo::Resources::Post < Avo::BaseResource
  self.confirm_on_save = true
end
This option defaults to false
-> default_view_type
On Index, the most common view type is :table, but you might have some data that you want to display in a :grid or :map. You can change that by setting default_view_type to :grid and by adding the grid block.
class Avo::Resources::Post < Avo::BaseResource
  self.default_view_type = :grid
end
Find out more on the grid view documentation page.
Since v3.5.6default_view_type become callable. Within this block, you gain access to all attributes of Avo::ExecutionContext along with the resource and view. Example:class Avo::Resources::Post < Avo::BaseResource
self.default_view_type = -> {
mobile_user = request.user_agent =~ /Mobile/
mobile_user ? :table : :grid
}
end-> self.model_class
For some resources you might have a model that is namespaced, or you might have a secondary resource for a model. For that scenario, you can use the self.model_class option to tell Avo which model to reference in that resource.
class Avo::Resources::DelayedJob < Avo::BaseResource
  self.model_class = "Delayed::Job"

  def fields
    field :id, as: :id
  end
end
-> self.devise_password_optional
If you use devise and update your user models (usually User) without passing a password, you will get a validation error. You can use devise_password_optional to stop receiving that error. It will strip out the password key from params.
class Avo::Resources::User < Avo::BaseResource
  self.devise_password_optional = true
end
Related
-> self.visible_on_sidebar
When you get started, the sidebar will be auto-generated for you with all the dashboards, resources, and custom tools. However, you may have resources that should not appear on the sidebar, which you can hide using the visible_on_sidebar option.
class Avo::Resources::TeamMembership < Avo::BaseResource
  self.visible_on_sidebar = false
end
WARNING
This option is used in the auto-generated menu, not in the menu editor.
You'll have to use your own logic in the visible block for that.
-> config.buttons_on_form_footers
If you have a lot of fields on a resource, that form might get pretty tall. So it would be useful to have the Save button in the footer of that form.
You can do that by setting the buttons_on_form_footers option to true in your initializer. That will add the Back and Save buttons on the footer of that form for the New and Edit screens.
# config/initializers/avo.rb
Avo.configure do |config|
  config.buttons_on_form_footers = true
end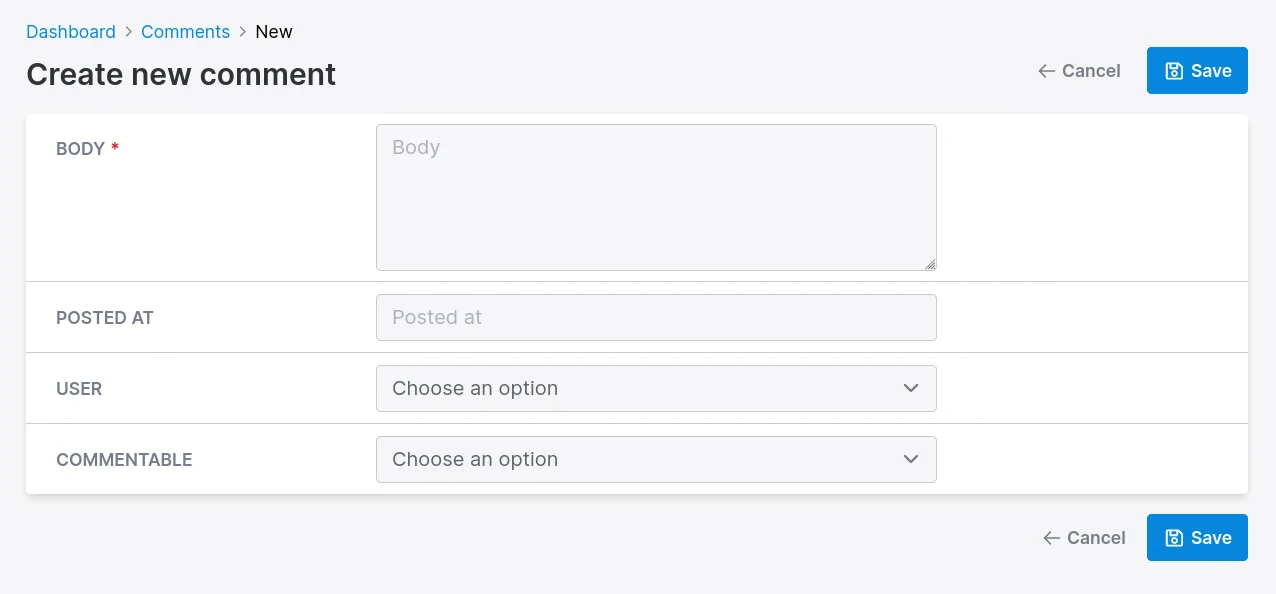
-> after_create_path/after_update_path
For some resources, it might make sense to redirect to something other than the Show view. With after_create_path and after_update_path you can control that.
The valid options are :show (default), :edit, or :index.
class Avo::Resources::Comment < Avo::BaseResource
  self.after_create_path = :index
  self.after_update_path = :edit
end
Related
You can go more granular and customize these paths or response more using controller methods.
-> self.record_selector
You might have resources that will never be selected, and you do not need that checkbox to waste your horizontal space.
You can hide it using the record_selector class_attribute.
class Avo::Resources::Comment < Avo::BaseResource
  self.record_selector = false
end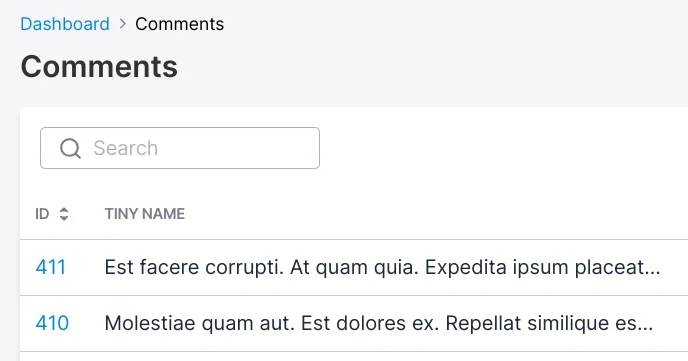
-> self.link_to_child_resource
Let's take an example. We have a Person model and Sibling and Spouse models that inherit from it using Single Table Inheritance (STI).
When you declare this option on the parent resource Person it has the following effect. When a user is on the Index view of your the Person resource and clicks to visit a Person record they will be redirected to a Child or Spouse record instead of a Person record.
class Avo::Resources::Person < Avo::BaseResource
  self.link_to_child_resource = true
end
-> self.keep_filters_panel_open
There are scenarios where you wouldn't want to close the filters panel when you change the values. For that, you can use the keep_filters_panel_open resource option.
class Avo::Resources::Course < Avo::BaseResource
  self.keep_filters_panel_open = true

  def fields
    field :id, as: :id
    field :name, as: :text
  end

  def filters
    filter Avo::Filters::CourseCountryFilter
    filter Avo::Filters::CourseCityFilter
  end
end
-> self.components
By default, for each view we render an component:
Index -> Avo::Views::ResourceIndexComponent
Show -> Avo::Views::ResourceShowComponent
New, Edit -> Avo::Views::ResourceEditComponent
It's possible to change this behavior by using the self.components resource option.
self.components = {
  resource_index_component: Avo::Views::Users::ResourceIndexComponent,
  resource_show_component: "Avo::Views::Users::ResourceShowComponent",
  resource_edit_component: "Avo::Views::Users::ResourceEditComponent",
  resource_new_component: Avo::Views::Users::ResourceEditComponent
}Here is a list of all the supported customizable components:
self.components = {
  "Avo::Views::ResourceIndexComponent": Avo::Custom::ResourceIndexComponent,
  "Avo::Views::ResourceShowComponent": "Avo::Custom::ResourceShowComponent",
  "Avo::Views::ResourceEditComponent": "Avo::Custom::ResourceEditComponent",
  "Avo::Index::GridItemComponent": "Avo::Custom::GridItemComponent",
  "Avo::Index::ResourceMapComponent": "Avo::Custom::ResourceMapComponent",
  "Avo::Index::ResourceTableComponent": "Avo::Custom::ResourceTableComponent",
  "Avo::Index::TableRowComponent": "Avo::Custom::TableRowComponent"
}
A resource configured with the example above will start using the declared components instead the default ones.
WARNING
The custom view components must ensure that their initializers are configured to receive all the arguments passed during the rendering of a component. You can verify this in our codebase through the following files:
Index -> app/views/avo/base/index.html.erb
Show -> app/views/avo/base/show.html.erb
New -> app/views/avo/base/new.html.erb
Edit -> app/views/avo/base/edit.html.erb
Creating a customized component for a view is most easily achieved by ejecting one of our pre-existing components using the --scope parameter. You can find step-by-step instructions in the documentation here.
Alternatively, there is another method which requires two additional manual steps. This involves crafting a personalized component by extracting an existing one and adjusting its namespace. Although changing the namespace is not mandatory, we strongly recommend it unless you intend for all resources to adopt the extracted component.
Example:
- Execute the command
bin/rails generate avo:eject --component Avo::Views::ResourceIndexComponentto eject the specified component. - Access the newly ejected file and adjust the namespace. You can create a fresh directory like
my_dirand transfer the component to that directory. - You have the flexibility to establish multiple directories, just ensure that the class name corresponds to the path of the directories.
- Update the class namespace in the file from
Avo::Views::ResourceIndexComponenttoAvo::MyDir::Views::ResourceIndexComponent. - You can now utilize the customized component in a resource.
self.components = {
  resource_index_component: Avo::MyDir::Views::ResourceIndexComponent
}
This way you can choose the whatever namespace structure you want and you assure that the initializer is accepting the right arguments.
-> self.index_query
Unscoped queries on Index
You might have a default_scope on your model that you don't want to be applied when you render the Index view.
class Project < ApplicationRecord
  default_scope { order(name: :asc) }
end
You can unscope the query using the index_query method on that resource.
class Avo::Resources::Project < Avo::BaseResource
  self.title = :name
  self.index_query = -> { query.unscoped }
end
-> self.default_sort_column
By default, Avo sorts records on the Index view by the created_at attribute. However, you can customize this behavior using the default_sort_column option in your resource file.
Default
:created_at
Possible values
Any symbol representing a sortable column in your model. If the specified column doesn't exist in the model, Avo will fall back to the default sort column (created_at).
class Avo::Resources::User < Avo::BaseResource
  self.default_sort_column = :last_name

  def fields
    field :id, as: :id
    field :last_name, as: :text
  end

  # other resource configurations...
end
INFO
When changing the default sort column, it's recommended to add an index to that column in your database for better query performance.
# Example migration
class AddIndexOnUsersCreatedAt < ActiveRecord::Migration[7.1]
  def change
    add_index :users, :last_name
  end
end
Related:
-> self.default_sort_direction
By default, Avo sorts records in descending order of the default sort column. However, you can customize this using the self.default_sort_direction option in your resource file.
Default
:desc
Possible values
Either :desc (descending) or :asc (ascending).
class Avo::Resources::Task < Avo::BaseResource
  self.default_sort_column = :position
  self.default_sort_direction = :asc

  # ...
end
-> self.controls_placement
WARNING
Since v3.16.3controls_placement option is obsolete.Check row controls configuration on table view instead
By default, Avo renders action controls according to the controls_placement configuration, which is set to right by default. This value can be customized for each individual resource.
Possible values
Either :left, :right or :both
# app/avo/resources/task.rb
class Avo::Resources::Task < Avo::BaseResource
  self.controls_placement = :both
end
-> self.pagination
This feature is designed for managing pagination. For example on large tables of data sometimes count is inefficient and unnecessary.
By setting self.pagination[:type] to :countless, you can disable the pagination count on the index page.
This is especially beneficial for large datasets, where displaying the total number of items and pages may have some performance impact.
# As block:
self.pagination = -> do
  {
    type: :default,
    size: [1, 2, 2, 1],
  }
end

# Or as hash:
self.pagination = {
  type: :default,
  size: [1, 2, 2, 1],
}
The exposed pagination setting above have the default value for each key.
type
Possible values
:default, :countless
Default
:default
size
Possible values
Pagy docs - Control the page links
Default
[1, 2, 2, 1] - before 3.11.5
9 - Since v3.11.5
Examples
Default
self.pagination = -> do
  {
    type: :default,
    size: [1, 2, 2, 1],
  }
end
Countless
self.pagination = -> do
  {
    type: :countless
  }
end
Countless and "pageless"
self.pagination = -> do
  {
    type: :countless,
    size: []
  }
end
-> cache_hash
The cache_hash method is used to compute the cache key for each row. The method looks something like this:
def cache_hash(parent_record)
  result = [record, file_hash]

  if parent_record.present?
    result << parent_record
  end

  result
end

def file_hash
  content_to_be_hashed = ""

  file_name = self.class.underscore_name.tr(" ", "_")
  resource_path = Rails.root.join("app", "avo", "resources", "#{file_name}.rb").to_s
  if File.file? resource_path
    content_to_be_hashed += File.read(resource_path)
  end

  # policy file hash
  policy_path = Rails.root.join("app", "policies", "#{file_name.gsub("_resource", "")}_policy.rb").to_s
  if File.file? policy_path
    content_to_be_hashed += File.read(policy_path)
  end

  Digest::MD5.hexdigest(content_to_be_hashed)
end
It's an md5 of the resource file name, the policy file (so the cache gets busted when the rules change). We also add the parent_record when it's displayed in as an association, so there's a separate cache record for each association.
This is the default, but if you have special requirements you can add it to your resource file and it will be used to cache your records accordingly.
class Avo::Resources::User < Avo::BaseResource
  def cache_hash(parent_record)
    result = [record, file_hash, "SOMETHING_NEW"]

    if parent_record.present?
      result << parent_record
    end

    result
  end

  # fields, cards and more
end
-> self.external_link
It's often desirable to provide users with a link to the public path of a record outside of the Avo interface. The external_link option allows you to achieve this.
Usage
To define an external link for a resource, set the self.external_link option with a lambda function. Within this lambda function, you gain access to all attributes of Avo::ExecutionContext along with the record.
class Avo::Resources::Post < Avo::BaseResource
  self.external_link = -> {
    main_app.post_path(record)
  }
end
The self.external_link lambda should return a string representing the URL of the record.
You can use path helpers from your application (e.g., main_app.post_path) or any external URL generator.
When this option is configured, Avo will display an external link button for the resource. Clicking it will take the user to the specified URL.
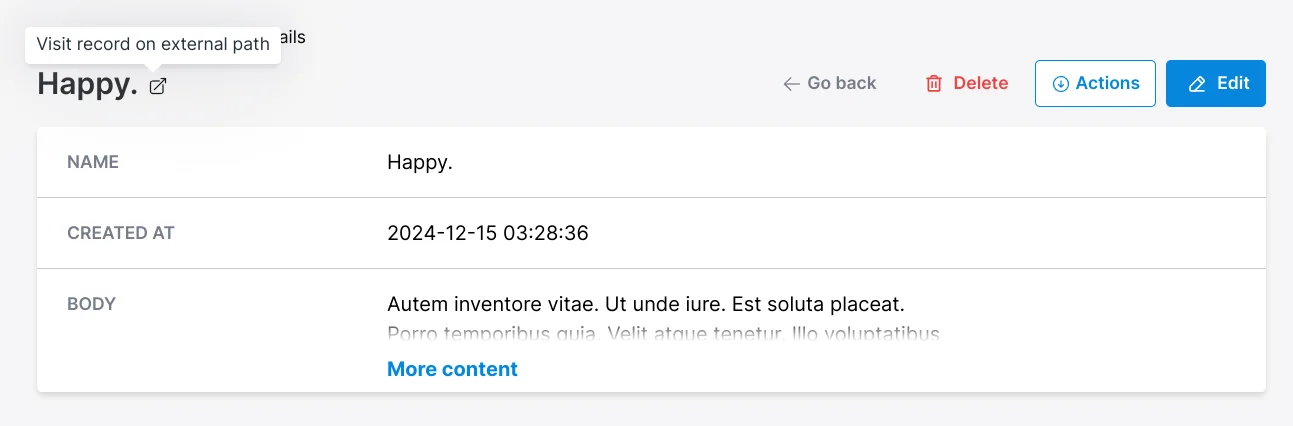
-> self.discreet_information
Oftern we want to show some information about records without adding another field. discreet_information does exactly that 🙌
More information on discreet_information
Cards
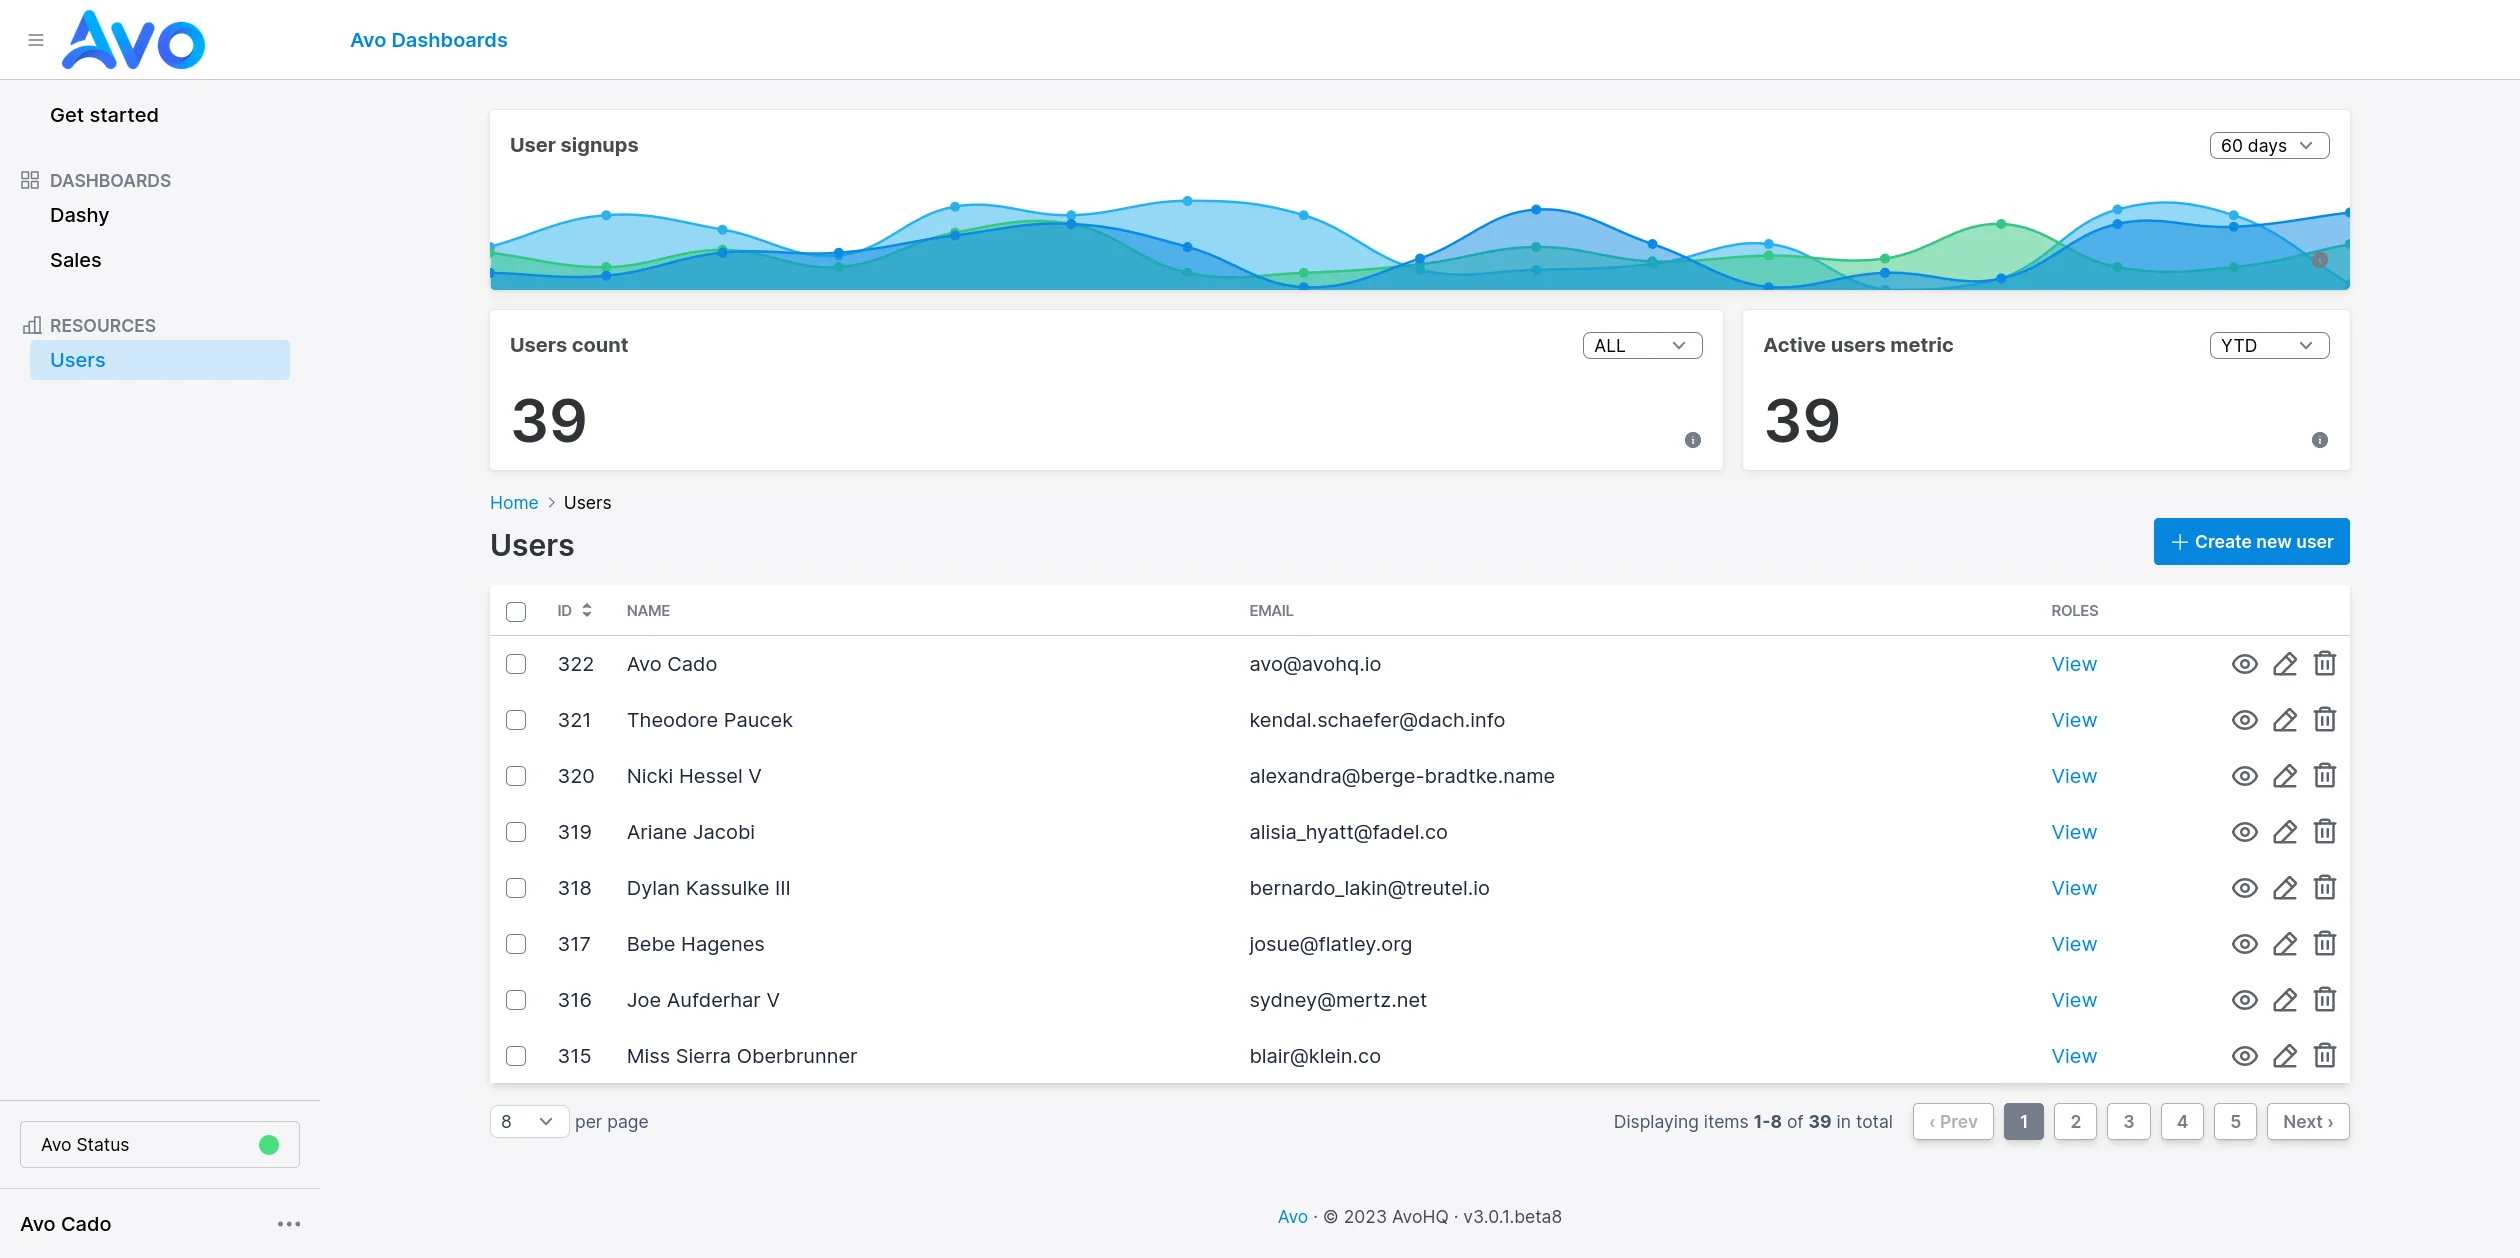
Use the def cards method to add some cards to your resource.
Check cards documentation for more details.
class Avo::Resources::User < Avo::BaseResource
  def fields
    field :id, as: :id
    field :name, as: :text
    field :email, as: :text
    field :roles, as: :boolean_group, options: {admin: "Administrator", manager: "Manager", writer: "Writer"}
  end

  def cards
    card Avo::Cards::ExampleAreaChart, cols: 3
    card Avo::Cards::ExampleMetric, cols: 2
    card Avo::Cards::ExampleMetric,
      label: "Active users metric",
      description: "Count of the active users.",
      arguments: { active_users: true },
      visible: -> { !resource.view.form? }
  end
end