 Friendly.rb - Your friendly European Ruby Conference
 Authentication
With Avo, you have the flexibility to build apps either with or without authentication. While Avo has minimal assumptions about its users, a few guidelines still apply:
- Users can be either authenticated or not. Avo apps can be developed without requiring user authentication.
- If you choose to implement authentication, you need to define the current_user.
- You can assign lightweight roles to your users.
- Any authentication strategy or gem of your choice can be utilized.
Rails 8 authentication scaffold
In essence, the authentication scaffold that Rails 8 comes with is custom authentication so we need to do a few things to ensure it's working.
Please follow this guide to enable it.
Customize the current_user method
Avo will not assume your authentication provider (the current_user method returns nil). That means that you have to tell Avo who the current_user is.
-> Rails authentication scaffold
Please follow this guide to Rails' authentication scaffold.
-> Devise
For devise, you should set it to current_user.
# config/initializers/avo.rb
Avo.configure do |config|
  config.current_user_method = :current_user
end
-> Other methods
Using another authentication provider, you may customize the current_user method to something else.
# config/initializers/avo.rb
Avo.configure do |config|
  config.current_user_method = :current_admin
end
If you get the current user from another object like Current.user, you may pass a block to the current_user_method key.
# config/initializers/avo.rb
Avo.configure do |config|
  config.current_user_method do
    Current.user
  end
end
Customize the sign-out link
If your app responds to destroy_user_session_path, a sign-out menu item will be added on the bottom sidebar (when you click the three dots). If your app does not respond to this method, the link will be hidden unless you provide a custom sign-out path. There are two ways to customize the sign-out path.
Customize the current user resource name
You can customize just the "user" part of the path name by setting current_user_resource_name. For example if you follow the User -> current_user convention, you might have a destroy_current_user_session_path that logs the user out.
# config/initializers/avo.rb
Avo.configure do |config|
  config.current_user_resource_name = :current_user
end
Or if your app provides a destroy_current_admin_session_path then you would need to set current_user_resource_name to current_admin.
# config/initializers/avo.rb
Avo.configure do |config|
  config.current_user_resource_name = :current_admin
end
Customize the entire sign-out path
Alternatively, you can customize the sign-out path name completely by setting sign_out_path_name. For example, if your app provides logout_path then you would pass this name to sign_out_path_name.
# config/initializers/avo.rb
Avo.configure do |config|
  config.sign_out_path_name = :logout_path
end
If both current_user_resource_name and sign_out_path_name are set, sign_out_path_name takes precedence.
Filter out requests
You probably do not want to allow Avo access to everybody. If you're using devise in your app, use this block to filter out requests in your routes.rb file.
authenticate :user do
  mount_avo at: '/avo'
end
You may also add custom user validation such as user.admin? to only permit a subset of users to your Avo instance.
authenticate :user, -> user { user.admin? } do
  mount_avo at: '/avo'
end
Check out more examples of authentication on sidekiq's authentication section.
authenticate_with method
Alternatively, you can use the authenticate_with config attribute. It takes a block and evaluates it in Avo's ApplicationController as a before_action.
# config/initializers/avo.rb
Avo.configure do |config|
  config.authenticate_with do
    authenticate_admin_user
  end
end
Note that Avo's ApplicationController does not inherit from your app's ApplicationController, so any protected methods you defined would not work. Instead, you would need to explicitly write the authentication logic in the block. For example, if you store your user_id in the session hash, then you can do:
# config/initializers/avo.rb
Avo.configure do |config|
  config.authenticate_with do
    redirect_to '/' unless session[:user_id] == 1 # hard code user ids here
  end
end
User roles
There might be cases where you want to signal to Avo that the current user has a role.
Avo roles are very lightweight and that's for a reason. Building with roles in mind requires a bit more integration with the parent app. This is something that you can definitely take upon yourself to build if you need it.
There are two extra roles that you can give to a user, besides the regular user. These roles can be assigned with a check on the current_user object.
-> 1. Admin user
The check that Avo will do to figure that out is to run the is_admin? method on the current_user object.
Check if a user is an admin
You can do that check yourself using the Avo::Current.user_is_admin?.
When does Avo check if the use is an admin (is_admin?)
Avo doesn't use this setting momentarily but might in the future.
-> 2. Developer user
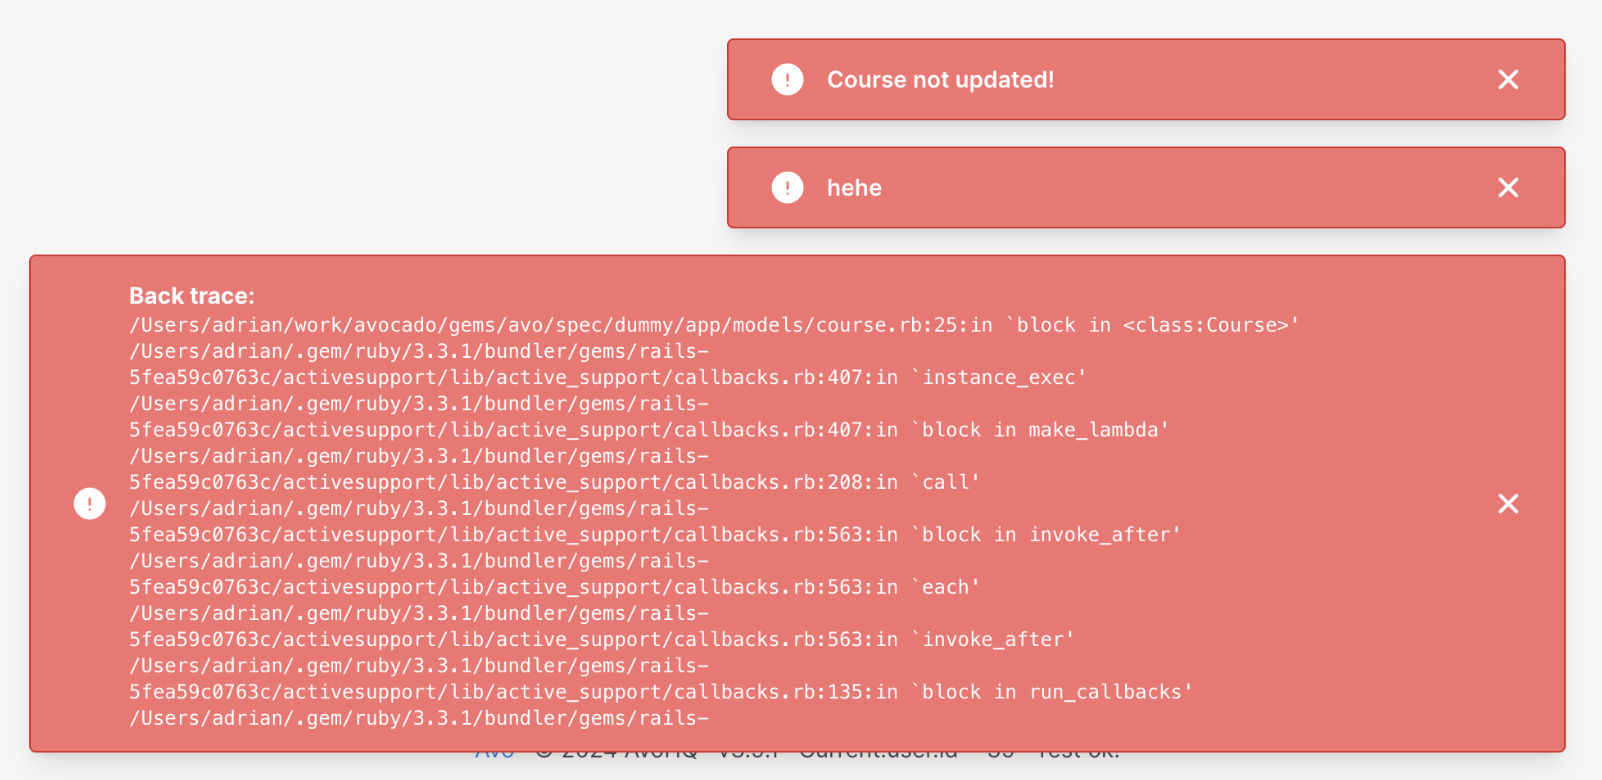
There might be cases where you want to signal that a user is a developer. The developer will be able to see extra things like long backtrace messages in errors.
The check that Avo will do to figure that out is to run the is_developer? method on the current_user object.
Check if a user is an developer
You can do that check yourself using the Avo::Current.user_is_developer?.
When does Avo check if the use is an developer (is_developer?)
Avo uses this role to display long backtraces on non-validation errors. Ex: on record save, you might call an API which by some reason errors out. Instead of just getting a generic "Something went wrong" error, the developer user will see the error message and backtrace
Customize the methods that check for roles
You may customize the methods that Avo uses to assign roles in the initializer.
# config/avo.rb
Avo.configure do |config|
  config.is_admin_method = :is_admin?
  config.is_developer_method = :is_developer?
end
Authorization
When you share access to Avo with your clients or large teams, you may want to restrict access to a resource or a subset of resources. You should set up your authorization rules (policies) to do that. Check out the authorization page for details on how to set that up.