
Gem server authentication
Avo comes in a few tiers. The Community tier is a free gem available on rubygems.org, and a few paid tiers ship as private gems hosted on our own private gems server (packager.dev).
To access the paid gems you must authenticate using the Gem Server Token found on your dashboard.
There are a few ways to do that. We focus on the most important and secure ones: on the server and CI systems and on your local development environment.
INFO
We use the xxx notation instead of the actual gem server token.
On the server and CI systems
Recommendation
This is the recommended way for most use cases.
The best way is to register this environment variable so bundler knows to use it when pulling packages from packager.dev.
export BUNDLE_PACKAGER__DEV=xxx
# or
BUNDLE_PACKAGER__DEV=xxx bundle install
Each hosting service has its own way to add environment variables. See how to do it on Heroku, Hatchbox, GitHub Actions, Docker or Kamal.
Warning about using the .env file
You might be tempted to add the token to your .env file, as you might do with your Rails app. That will not work because bundler will not automatically load those environment variables.
Add the environment variable through the service's dedicated page or by running the export command before bundle install.
Heroku
Set the environment variable with the following command. This way bundler uses it when authenticating to packager.dev.
heroku config:set BUNDLE_PACKAGER__DEV=xxxHatchbox
Set the environment variable in your app's "Environment" tab. This way bundler uses it when authenticating to packager.dev.
BUNDLE_PACKAGER__DEV: xxxGitHub Actions
You might need to install Avo's paid gems in your GitHub Actions pipeline. There are two steps to enable that.
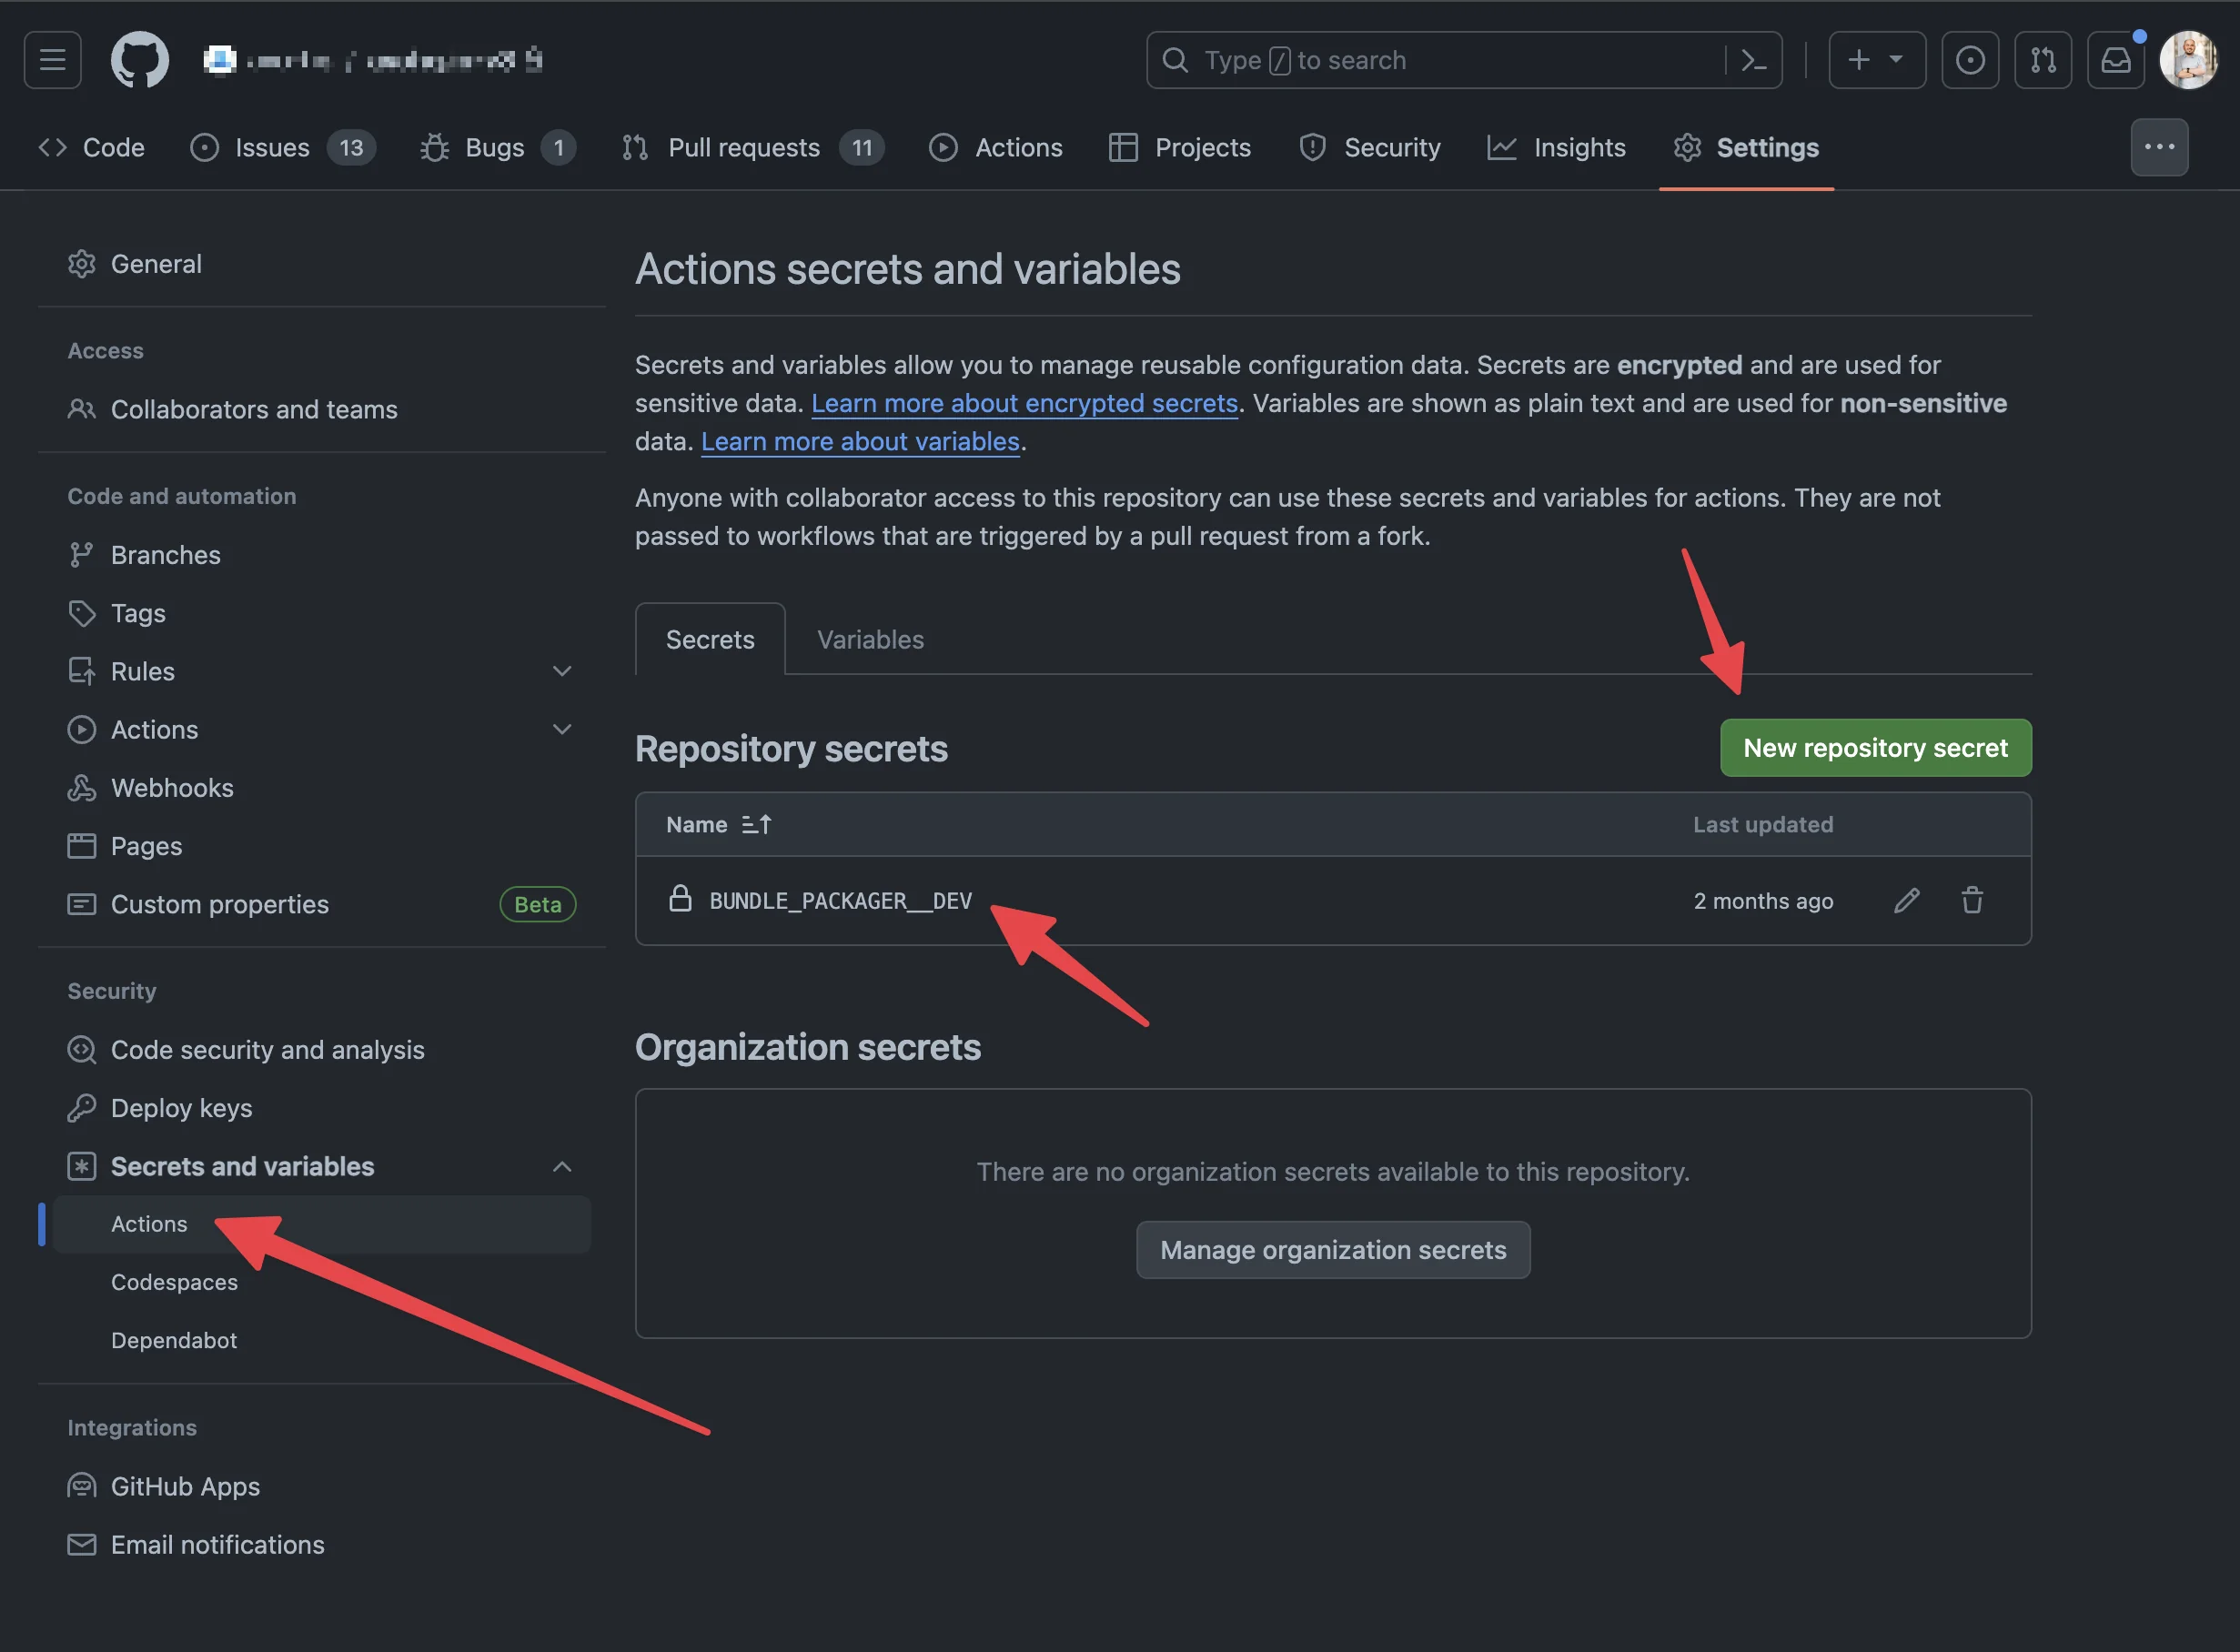
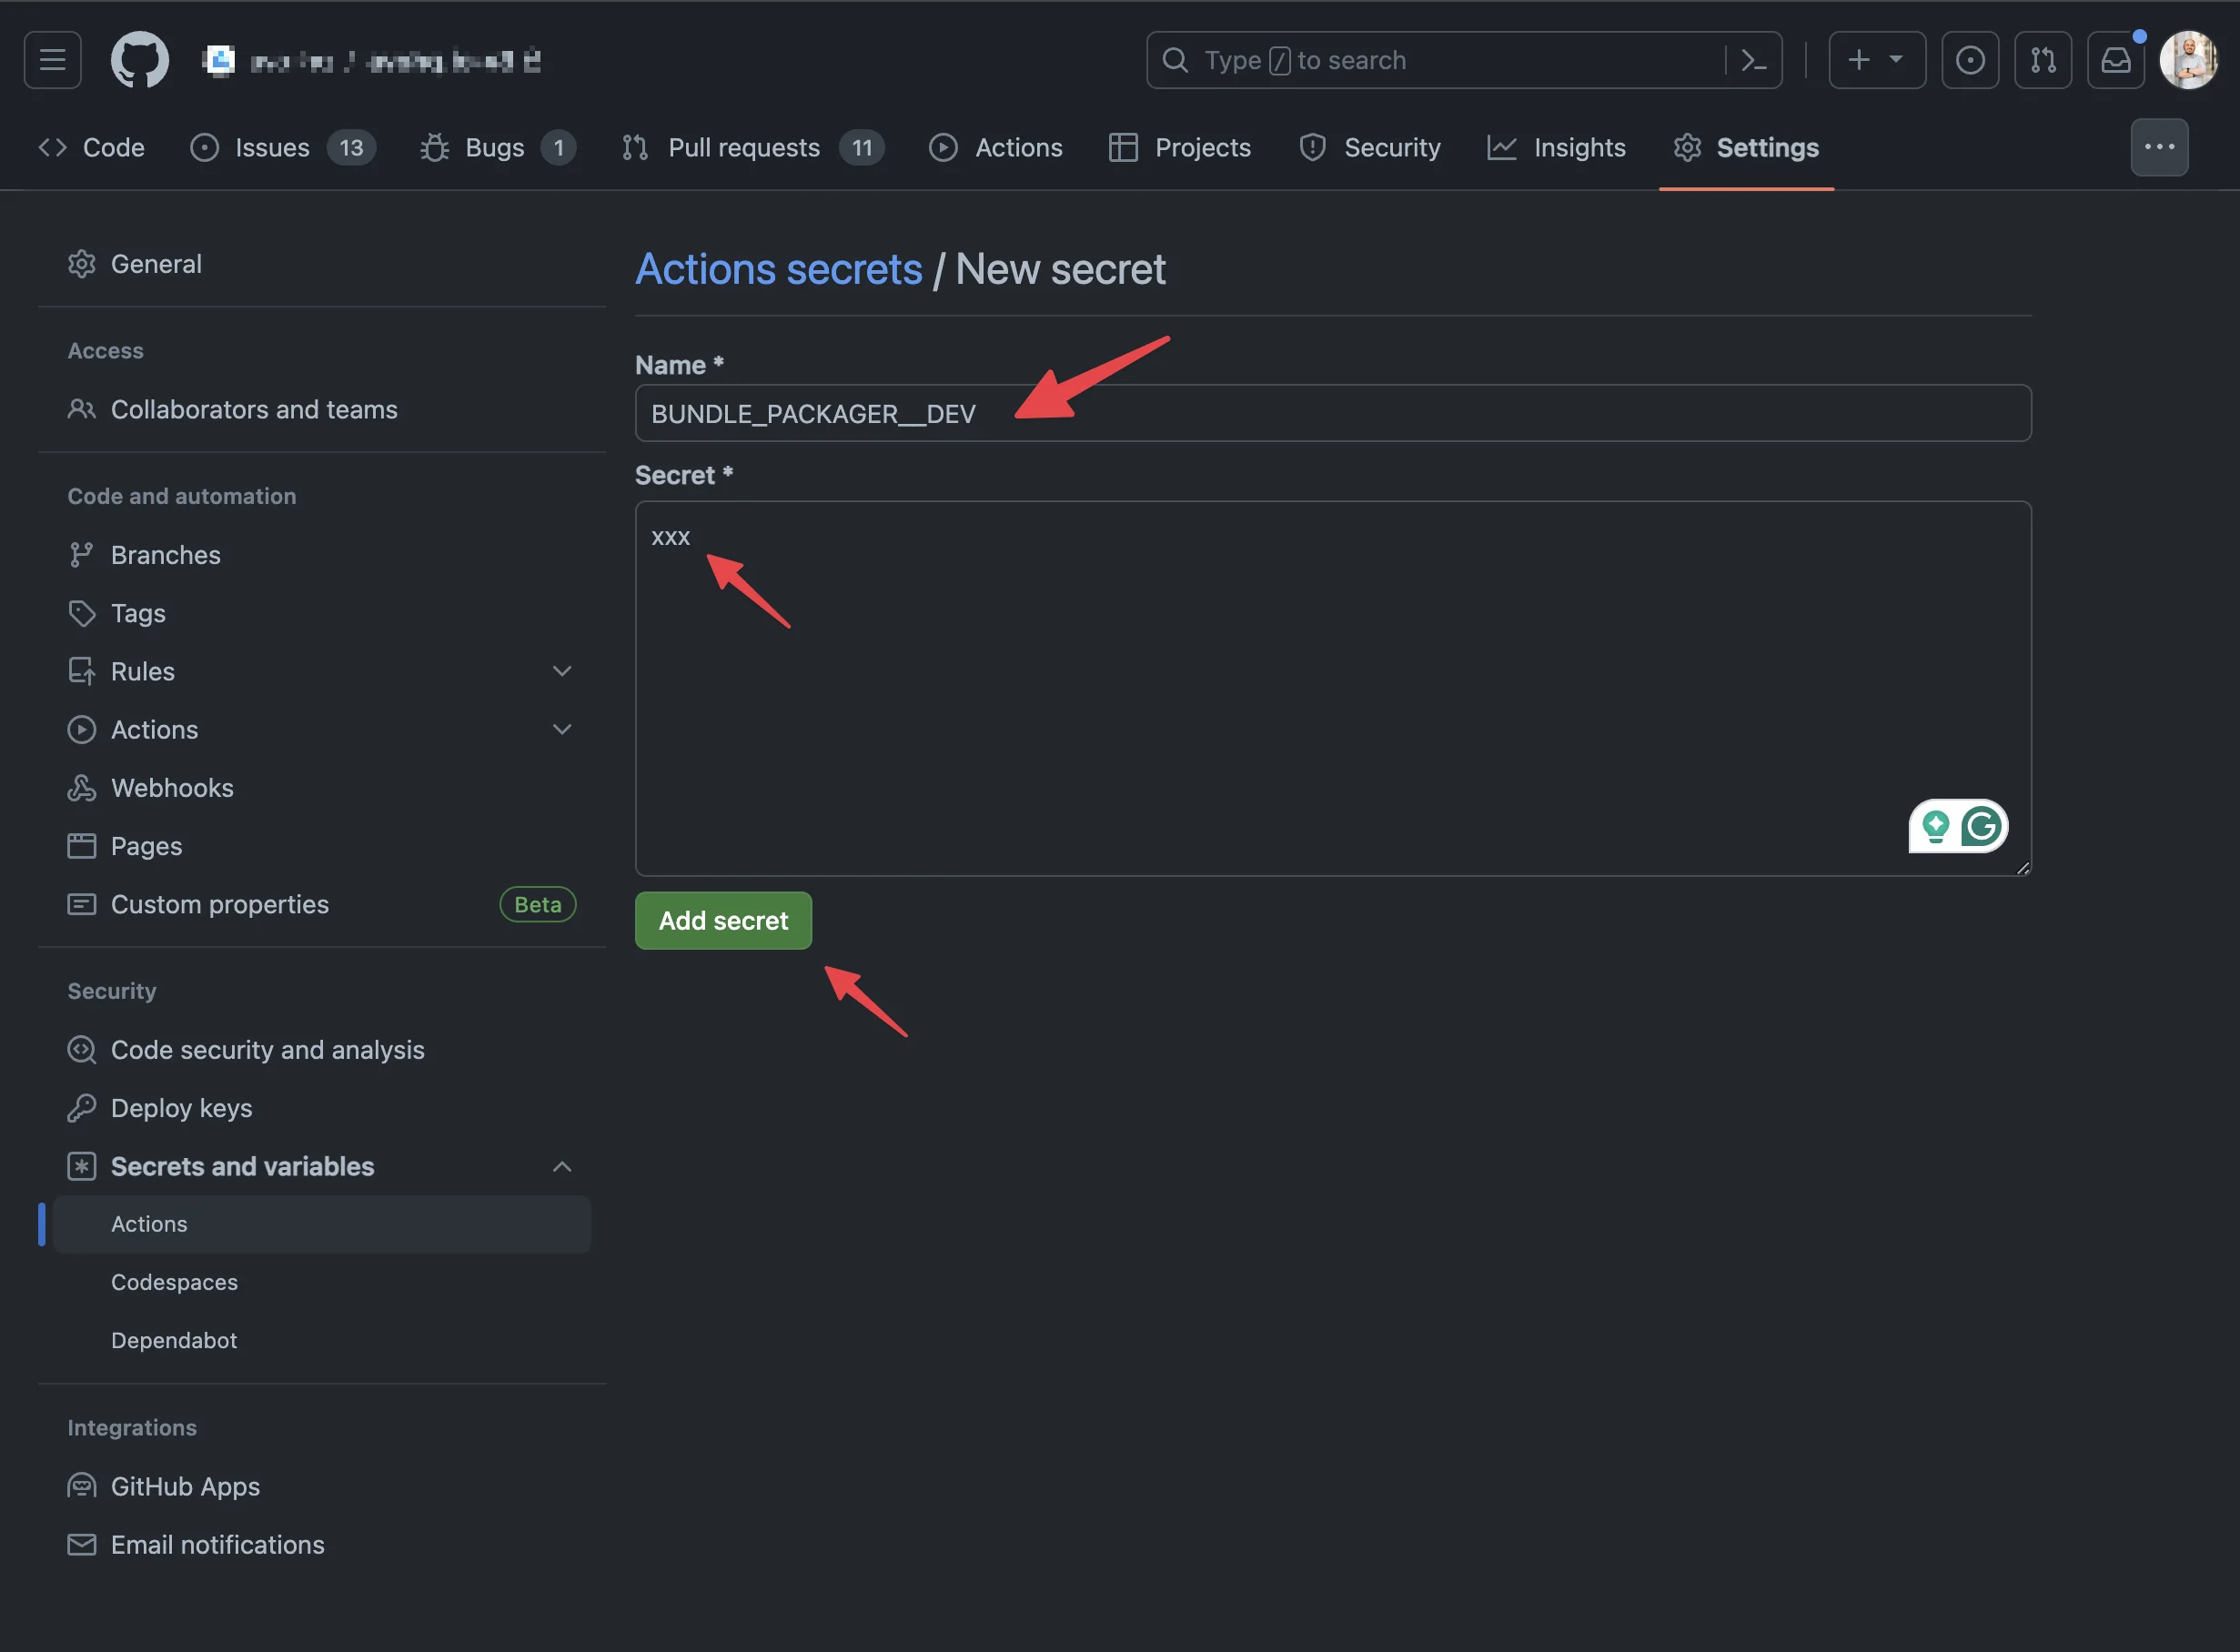
1. Add BUNDLE_PACKAGER__DEV to your repository's secrets
In your repo, go to Settings → Secrets and Variables → Actions → New repository secret and add your gem server token with the name BUNDLE_PACKAGER__DEV and the token as the value.
2. Expose BUNDLE_PACKAGER__DEV as an environment variable
Then, in your workflow file, expose that configuration item as an environment variable.
# .github/workflows/test.yml
name: Tests

on:
  pull_request:
    branches:
      - main

env:
  BUNDLE_PACKAGER__DEV: ${{secrets.BUNDLE_PACKAGER__DEV}}

jobs:
  test:
    runs-on: ubuntu-latest

    steps:
      # Testing and deployment steps
Docker and Docker Compose
Build with Docker by passing a build argument from your environment.
# Dockerfile
FROM ruby:3.2.2
RUN apt-get update -qq && apt-get install -y nodejs postgresql-client
WORKDIR /app
COPY Gemfile /app/Gemfile
COPY Gemfile.lock /app/Gemfile.lock

# get the build argument
ARG BUNDLE_PACKAGER__DEV
# make it available in the docker image
ENV BUNDLE_PACKAGER__DEV=$BUNDLE_PACKAGER__DEV

RUN bundle install
COPY . /app
# do more stuff# Pass the key to the build argument
docker build --build-arg BUNDLE_PACKAGER__DEV=xxx
# OR
# Set the key as an environment variable on your machine
# Somewhere in your `.bashrc` or `.bash_profile` file
export BUNDLE_PACKAGER__DEV=xxx
# Then pass it to the build argument from there
docker build --build-arg BUNDLE_PACKAGER__DEV=$BUNDLE_PACKAGER__DEVdocker compose build --build-arg BUNDLE_PACKAGER__DEV=xxxKamal
Kamal setup is very similar to Docker: include BUNDLE_PACKAGER__DEV in your secrets and then use it in your Dockerfile.
In your deploy.yml:
# config/deploy.yml
# Configure builder setup.
builder:
  arch: amd64
  secrets:
    - BUNDLE_PACKAGER__DEV
Then in .kamal/secrets:
# .kamal/secrets
# However you set your secrets in Kamal
BUNDLE_PACKAGER__DEV=xxx
Finally, in your Dockerfile:
# Dockerfile
# Install application gems
COPY Gemfile Gemfile.lock ./

RUN --mount=type=secret,id=BUNDLE_PACKAGER__DEV BUNDLE_PACKAGER__DEV=$(cat /run/secrets/BUNDLE_PACKAGER__DEV) bundle install  && \
    rm -rf ~/.bundle/ "${BUNDLE_PATH}"/ruby/*/cache "${BUNDLE_PATH}"/ruby/*/bundler/gems/*/.git && \
    bundle exec bootsnap precompile --gemfile
On your local development environment
For your local development environment, add the token to the default bundler configuration. This way bundler is aware of it without having to specify it in the Gemfile.
bundle config set --global https://packager.dev/avo-hq/ xxxAdd Avo to your Gemfile
Now you are ready to add Avo to your Gemfile.
# Avo Community
gem "avo", ">= 4.0.0"

# If you're on a paid plan, add the feature gems included in your license.
source "https://packager.dev/avo-hq/" do
  # all or some of these
  gem "avo-authorization", ">= 4.0.0"
  gem "avo-advanced_search", ">= 4.0.0"
  gem "avo-advanced_file_uploads", ">= 4.0.0"
  gem "avo-record_reordering", ">= 4.0.0"
  gem "avo-menu_editor", ">= 4.0.0"
  gem "avo-menu", ">= 4.0.0"
  gem "avo-dashboards", ">= 4.0.0"
  gem "avo-http_resource", ">= 4.0.0"
  gem "avo-dynamic_filters", ">= 4.0.0"
  gem "avo-nested", ">= 4.0.0"
  gem "avo-collaboration", ">= 4.0.0"
  gem "avo-forms", ">= 4.0.0"
  gem "avo-kanban", ">= 4.0.0"
  gem "avo-api", ">= 4.0.0"
  gem "avo-reactive_fields", ">= 4.0.0"
  gem "avo-notifications", ">= 4.0.0"
end
Run bundle install and bundler picks up the token and uses it to authenticate on the server.
Bundle without the paid gems
If you need to distribute your Rails app without the paid gems, move them to an optional group.
RAILS_GROUPS=avo BUNDLE_WITH=avo bundle install# Gemfile
gem "avo"
group :avo, optional: true do
source "https://packager.dev/avo-hq/" do
gem "avo-advanced", "~> 4.0"
end
endFAQ
Forbidden 403
If you're seeing this error Retrying download gem from https://packager.dev/avo-hq/ due to error (1/4): Gem::RemoteFetcher::FetchError bad response Forbidden 403, this probably means that bundler does not have access to the BUNDLE_PACKAGER__DEV environment variable.
Read the guides above on how to set it on your development machine and in deployment scenarios.
Forbidden 403 in a sandboxed or cloud environment (Cursor Cloud)
If the token is set correctly but you still get a 403 Forbidden inside a sandboxed or cloud environment (for example the Claude Code cloud environment, Cursor's background/cloud agents, or any setup with restricted network egress), the request to packager.dev is likely being blocked by a network allowlist rather than failing authentication.
Add packager.dev to the environment's list of allowed hosts and run bundle install again.